Posts

Showing posts from 2017

@Overrride annotation introduced in Java1.5

Whenever we have a subclass that implements parent method it is marked with annotation as @Override. This is to make compiler know that the child overrides the method defined or declared in parent. If @Overrride annotation is commented, the subclass will work as it was. But if in future, the signature of parent class changes, the compiler wont ask to implement the method instead it will think subclass has overloaded the method present in base class. If you uncomment @Override annotation, the compiler will throw compile time error as method signature in parent class has changed. Annotation should be used as standard as- It ensures that for any change in method signature of parent class, compiler will ask to change it for the subclasses.    Also it is better to resolve issue in compile time rather than runtime
Open-Closed Principle

'A class should be open for extension closed for modification.' The above principle explains that a class once defined should not be changed(closed for modification). This is because it may impact other parts of application. Hence, if modification is needed, that class behaviour should be extended and modification should be done. (open for extension) Consider a scenario where area of a shape(like rectangle, square, circle) is calculated within Main class. Now addition of any new shape will lead to change in Main class. This concludes that the Shape is tightly coupled with Main class. In order to avoid this Shape should be inherited by diff Shape classes like Rect, Triangle, Circle implementing the behaviour of calculating area() and Main class should be loosely coupled by using Shape.area() (as Triangle, Rectangle are Shape). Hence, Shape interface is contract between its concrete classes and Main class. This allows us to add new shape class without any impact on exi

Interface Segregation Principle

'Clients should not be forced to depend upon interfaces having methods that client do not need.' This principle is closely related to Single Responsibility Principle as it supports the idea of having a specific interface than a generic purpose interface (known as 'Fat Interface' or 'Polluted Interface'). If we have a single interface having various functionality, a child implementing that interface will implement desired method along with all the other unwanted methods of that interface for no reason. An interface declaring much more work should be break down to small interfaces that specifies its purpose. This allows the child class to inherit the interface it wants, to achieve a purpose. For eg:    public interface DocumentGenerator{       public void abstract generateWordDoc( );       public void abstract generatePdf( );       public void abstract generateTxt( );    }    class OutBound implements DocumentGenerator {       pub

Liskov Substitution Principle (LSP)

Subtypes must be substitutable for their base types. This principle supports the below scenario-    Suppose a method takes parent type and perform some operation on it.    And the subtype is not of type - parent but still wrongly inherits the parent.        If the above subtype object is passed to such method, the operation performed will be weird as the method assumes it is suppose to be parent type. Hence, a class should inherit parent only if its of that type. (eg: Square is not Rectangle programmatically as the area is always side^2) 

Single Responsibility Principle

The class should have only one reason to change. This principle overcomes the below drawbacks- If the class has more than one reason to change, Change in one area impacts the other. This makes the code more fragile (easily to break). Difficult to test and maintain. Tight coupling. Less cohesive (a class has many action) and hence not focusing on what it is suppose to do. Hence, Single responsibility boils down to high cohesion i.e. a class focus on what it should be doing (methods related to the intention of class)  

Dependency Injection Principle

Suppose there are two classes - A.java and B.java where A.java consumes B.java as below- class A{    B b = new B(); }  The above code shows that the two classes are tightly coupled and hence have following drawback- In case class A wishes to switch to another class instead of B, say class C then we need to make changes in class A which is not desireable. If A is further inherited by other classes, then change mentioned in point 1 will affect ALL the child classes.  Testing of class A will be difficult because its directly using B hence, mocking of class B is not possible.  One solution to above problem is -    class A{       B b;    } But here, we are asking the calling class to initialize class B for A, which is not a good practise. Also, it still holds above concerns. The above issue is resolved by 'Dependency Injection Princple' which states that - Two classes should be loosely coupled. This can be achieved by an interface or abstract class defining

S.O.L.I.D. Class Design Principles

Abbreviation Full Form Definition Reason S Single Responsibility Principle A class should have only one reason to change i.e. should have only one purpose to serve.  - loosely coupled - less change lead to less break down of application - helps to change identity of object without affecting other modules O Open-Closed Principle A class should be open for extension closed for modification. - Anyone need to make change in your class has to inherit the class and change. This allows the existing functionality to stay intact. L Liskov Substitution Principle Derived types should always be substitutable by its parent class (base type). Derived types should be compatible with its base type. For e.g.: Square is a Rectangle i.e. Square represents a Rectangle. In case, if we try to set dimension of a Rectangle reference pointing to Square instance, the flow will be weird as it will always override the dimension of rectangle. I Interface Segrega

Access Youtube Video via Android app

Youtube video are provided with a distinct key like -         https://www.youtube.com/watch?v=7fC016i3Zpg        https://www.youtube.com/watch?v=LbuUvVe_Gqc&t=37s 1. You need to download Youtube supporting library from here     and add paste it to the lib folder of app followed by adding it to gradle file as shown below. compile files( 'libs/YouTubeAndroidPlayerApi.jar' ) 2. Sync your project 3. Once you have the key, add the below code in your activity-       if (YouTubeIntents. canResolvePlayVideoIntentWithOptions( this )) {          //Opens in the YouTube app in fullscreen and returns to this app once the video finishes                      startActivity(             YouTubeIntents. createPlayVideoIntentWithOptions ( context , video.getKey(), true , true )           );      } Thats It!

URL hit by Retrofit Client

The URL that is formed and hit by EndpointInterface using Retrofit Client can be obtained by below: call.enqueue( new Callback<VideoList>() { @Override public void onResponse(Call<VideoList> call, Response<VideoList> response) { Log. d ( "URL: " , call.request().url().toString()); // here if (response.isSuccessful()) { } } @Override public void onFailure(Call<VideoList> call, Throwable t) { } });

Declare and Initialize Map in one line

public static LinkedHashMap<String, Integer> MOVIES_CATEGORY_MAP = new LinkedHashMap<String, Integer>() {{ put(Constants. CATEGORY_ALL_IN_ONE , R.drawable. movies ); put(Constants. CATEGORY_MOST_POPULAR_MOVIES , R.drawable. popular_movies ); put(Constants. CATEGORY_HIGHEST_RATED_MOVIES , R.drawable. highly_rated_movies ); put(Constants. CATEGORY_HIGHEST_RATED_MOVIES , R.drawable. highly_rated_movies ); put(Constants. CATEGORY_POPULAR_KIDS_MOVIES , R.drawable. kids_movies ); put(Constants. CATEGORY_UPCOMING_MOVIES , R.drawable. comingsoon ); }};

Audio Insertion

1. Add audio into res -> raw folder 2. In Activity class, add the below code to your class where you wish to play sound - MediaPlayer ring = MediaPlayer. create (MainActivity. this , R.raw. applause ); ring.start();

Butter Knife: ease to bind view in activity

ButterKnife is an open source that eases the way to bind view in activity class. Below is the example: 1. In build gradle,           compile  'com.jakewharton:butterknife:8.5.1' annotationProcessor 'com.jakewharton:butterknife-compiler:8.5.1' 2. Suppose there are two buttons having id -  android :id= "@+id/hiBtn"   android :id= "@+id/byeBtn" 3. In activity .java class,     a. Initialize your binding button variable as- @BindView (R.id. hiBtn ) Button hiBtn ; @BindView (R.id. byeBtn )       Button bye Btn ;     b.         For Activity class, in onCreate() method, ButterKnife. bind ( this );         For Fragment class, in onCreateView() method View view = inflater.inflate(R.layout.fancy_fragment, container, false ); ButterKnife.bind( this , view);    c.  And the button click event as, @OnClick (R.id. hiBtn ) public void sayHi(Button hiBtn) { hiBtn.setText( "He

Issue : Gradle Plugin Version is not in sync with Android version

Image
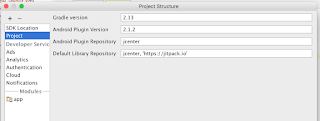
1. On execution of your android application, if the below issue occurs -  Gradle Plugin Version is not in sync with Android version 2. This means you need to update your gradle version. 3. In order to resolve the problem  Open Android studio Go to File -> Project Structure -> Project Here you will see, version of Gradle and Android- 4. In order to change that the version, go to below mentioned link- https://developer.android.com/studio/releases/gradle-plugin.html Here, you will see the compatible versions given in tabular format- 5. Update the Gradle version as suitable. 6. After updating, Android Studio will start syncing process.  7. Go ahead and run your application.

Spinner for Dropdown

Image
Spinner helps you to display the set of data (collection). It allows teh data to be displayed in drop down fashion. Example: 1. Lets define a static String array in Android XML file. <? xml version= "1.0" encoding= "utf-8" ?> < resources > < string-array name= "countries" > < item >India</ item > < item >U.A.E.</ item > < item >Nepal</ item > < item >China</ item > < item >Australia</ item > < item >United States</ item > < item >Europe</ item > < item >United Kingdom</ item > < item >Australia</ item > < item >Canada</ item > < item >Japan</ item > < item >Singapore</ item > </ string-array > </ resources > 2. Configure Spinner in your activity

Convert Collection to Array

1. Convert Set to Array of String           final HashMap<String, String> orderingOptionMap = new HashMap<String, String>();          orderingOptionMap.put("1", "Name: A-Z");          orderingOptionMap.put("2", "Name: Z-A");          orderingOptionMap.put("3", "Age: Ascending");          orderingOptionMap.put("4", "Age: Descending");          String[] orderingOption =   orderingOptionMap.keySet().toArray(new String[orderingOptionMap.size()]);           

String constant java class(created- StringConstant.java) vs string resource (strings.xml)?

Below are few points to consider before defining any string in any of the file- 1. Organize based on what makes sense!     Like, put string constants that highlights database connection credentials, table name, column name or any internal used constant in Java class where else the strings that are displayed to the user should go into strings.xml file. In short, strings.xml holds DISPLAY strings. 2. Constant declared in strings.xml file will be available only to context. Hence, whenever you want to use them make sure you have context to access them. Like in Adapters.

Check If table exist or not

​To check if table exists or not , below is the code snippet-    import java.sql.Connection;    import java.sql.DatabaseMetaData;    import java.sql.ResultSet;     public class Main {        public static void main(String[] argv) throws Exception {          Connection c = null;          DatabaseMetaData dbm = c.getMetaData();          ResultSet rs = dbm.ge​​tTables(null, null, "employee", null);          if (rs.next()) {            System.out.println("Table exists");           } else {            System.out.println("Table does not exist");           }        }     } For Android internal memory, SQLLite -      public boolean doesTableExists(String tableName) {         int tableCount = 0;         Cursor cursor = db.rawQuery( "SELECT name FROM sqlite_master WHERE name='" +  tableName+ "' AND type='table'; ", null );         while(cursor.moveToNext()) {             tableCount++;             brea

Difference between dp, dip, sp, px

Screen density is the amount of pixels within an area (like inch) of the screen. Generally it is measured in dots-per-inch (dpi). Screen density is grouped as low, medium, high and extra high. Resolution is the total number of pixels in the screen. dp: Density Independent Pixel , it varies based on screen density. In 160 dpi screen, 1 dp = 1 pixel. Except for font size, use dp always. dip: dip == dp. In earlier Android versions dip was used and later changed to dp. sp: Scale Independent Pixel , scaled based on user’s font size preference. Fonts should use sp. Always use dp and sp only. sp for font sizes and dp for everything else.

Read/Write Images

To read Image from Gallery- I worked on ImageButton to get Image from gallery: private void uploadImageClicked() {     new Thread(new Runnable() {         Intent intent = new Intent(Intent.ACTION_PICK);         public void run() {             openGallery(intent);         }     }).start(); } private void openGallery(Intent intent) {     intent.setType("image/*");       startActivityForResult(intent, 0); } The above piece of code open the Gallery to select the Image as desired. Here, we create an INTENT in order to access Gallery and hence, set the path as "image/*" and call startActivityForResult(intent, 0) so as to start the activity that utilize intent. To write Image from Gallery-     @Override     public void onActivityResult(int requestCode, int resultCode, Intent data) {         if (resultCode == RESULT_OK && null != data) {             uploadImageButton.setBackgroundResource(0);             Uri selectedImage = data.ge

Picasso Vs Glide

Below link gives great explaination between them- https://inthecheesefactory.com/blog/get-to-know-glide-recommended-by-google/en

Multiple Inheritance is not supported in Java

Below diagram explains is called Diamond Problem because of the inheritance structure.       A foo()           / \          /   \ foo() B C foo()          \   /           \ /         D foo() Multiple inheritance does cause casting, constructor chaining,etc problems. Also, multiple inheritance leads to complexity. Hence, Java do not support multiple inheritance. But recently, in JAVA 8, this problem is handled in different way, that is, the compiler will throw exception in this scenario and we will have to provide implementation logic in the class implementing the interfaces.

Java 8 Features

Java 8 has really come out to be powerful where it has improved the performance with boilerplate code with respect to collections, interface. Below are some key points- forEach() method in Iterable interface default and static methods in Interfaces Functional Interfaces and Lambda Expressions Java Stream API for Bulk Data Operations on Collections Java Time API Collection API improvements Concurrency API improvements Java IO improvements Miscellaneous Core API improvements You can have a deeper understanding in below mentioned link- http://www.journaldev.com/2389/java-8-features-with-examples https://leanpub.com/whatsnewinjava8/read  (Along with Github link) https://www.javacodegeeks.com/2014/03/8-new-features-for-java-8.html

Parcelable Object - passing data between intents

It is explained in a simple and elaborated way under below link- https://guides.codepath.com/android/using-parcelable#passing-data-between-intents

Can main() Method be overloaded or overridden

Overloading- Any Method can be overloaded. And hence, you can overloading main() method. But JVM will always call the original main method, it will never call your overloaded main method. Overridding- Main is a static method and static method cannot be overridden in Java. Hence, its not possible to override main() method.

Can static method be overridden?

Static methods are bonded during compile time (static binding). And hence, it resolves to reference variable and not Object. And hence, you cannot override static method.     For e.g. -           Parent p = new Child();          p.callStaticMethod();    This method will invoke Parent class method and not Child class. 

Remove Duplicates from ArrayList

ArrayList implements List Interface and hence, allows duplicates. 1. The simplest approach to remove repeated objects from ArrayList is to copy them to a Set e.g. HashSet and then copy it back to ArrayList. This will remove all duplicates without writing any more code. 2. If original order of elements in ArrayList is important for you, as List maintains insertion order, you should use LinkedHashSet because HashSet doesn't provide any ordering guarantee. 3. Iterate over the ArrayList to check for duplicate and remove() it. Please Note- If you are using deleting duplicates while iterating, make sure you use Iterator's remove() method and not the ArrayList one to avoid ConcurrentModificationException.  In this tutorial we will see this approach to remove duplicates. Also, If you don't prefer converting List to Set than you can still go with copying data from one ArrayList to other ArrayList and removing duplicates by checking with ArrayList.contains() method.